Disc golf is growing in popularity worldwide, and one of the most exciting aspects of the sport is the ability to create your own disc golf basket. Whether you're a seasoned player or a beginner, building your DIY disc golf basket can be a rewarding and cost-effective project. This guide will take you through every step, from planning to completion, ensuring you have all the tools and knowledge necessary to build a high-quality disc golf basket.
Creating your own disc golf basket offers numerous advantages. Not only does it allow you to customize the design to fit your preferences, but it also saves money compared to purchasing a commercial basket. With the right materials and instructions, anyone can build a functional and durable disc golf basket right at home.
This article will explore everything you need to know about DIY disc golf baskets, including essential components, tools, assembly tips, and maintenance advice. By the end, you'll be ready to start constructing your very own disc golf basket.
Read also:Alexandre Robicquet Age Unveiling The Fascinating Journey Of A Tech Visionary
Table of Contents
- Introduction to DIY Disc Golf Basket
- Essential Components of a Disc Golf Basket
- Tools You’ll Need for Construction
- Choosing the Right Design
- Selecting High-Quality Materials
- Step-by-Step Assembly Guide
- Customizing Your Disc Golf Basket
- Maintaining Your DIY Disc Golf Basket
- Cost Comparison: DIY vs. Commercial Baskets
- Expert Tips for Success
- Conclusion and Next Steps
Introduction to DIY Disc Golf Basket
DIY disc golf baskets have become increasingly popular among enthusiasts who want to personalize their equipment while saving costs. By building your own basket, you gain control over the design, materials, and overall quality of the final product. Additionally, the process can be an enjoyable and educational experience for those interested in hands-on projects.
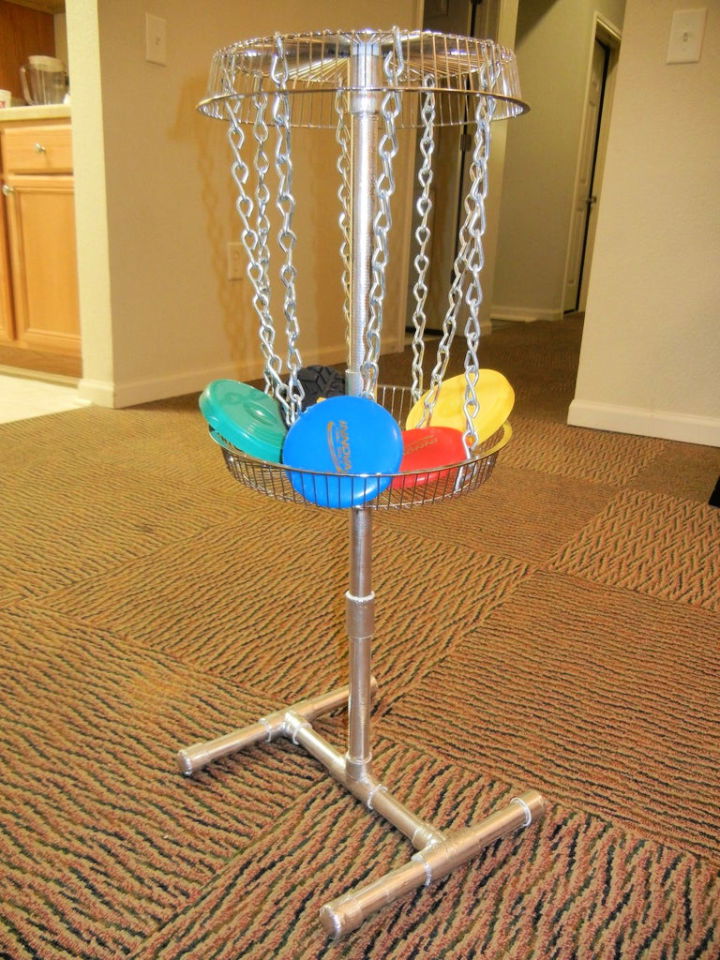
Before diving into construction, it's important to understand the basics of disc golf baskets. These structures consist of several key components, including the target assembly, chain assembly, basket, and pole mount. Each part plays a crucial role in ensuring the basket functions properly during gameplay.
Why Choose DIY?
There are several reasons why people opt for DIY disc golf baskets:
- Customization options
- Cost savings
- Learning experience
- Personal satisfaction
Essential Components of a Disc Golf Basket
A well-constructed DIY disc golf basket relies on several essential components. Understanding these parts is critical to ensuring your basket performs optimally during gameplay.
Target Assembly
The target assembly serves as the landing zone for the disc. It typically consists of chains arranged in a specific pattern to catch and hold the disc. The arrangement and material of the chains directly impact the basket's performance.
Chain Assembly
The chain assembly is arguably the most important component of a disc golf basket. It determines how effectively the basket catches and holds the disc. High-quality chains made from materials like stainless steel or aluminum are recommended for durability and performance.
Read also:Andreacutes Vaca Age Biography And Achievements
Basket
The basket itself acts as a secondary catching mechanism, providing additional support to hold the disc in place. It also helps prevent discs from bouncing out after being caught by the chains.
Pole Mount
The pole mount secures the entire basket to the ground, ensuring stability during gameplay. Options include in-ground mounts, portable stands, or weighted bases, depending on your needs and preferences.
Tools You’ll Need for Construction
Having the right tools on hand is essential for successfully building your DIY disc golf basket. Here's a list of tools you'll need:
- Welding equipment (if assembling metal parts)
- Drill press
- Screwdrivers
- Measuring tape
- Clamps
- Saw (for cutting materials)
Ensure all tools are in good working condition before starting your project. Safety gear, such as gloves and goggles, is also highly recommended.
Choosing the Right Design
Selecting the right design for your DIY disc golf basket is crucial. Consider factors such as:
- Space availability
- Intended use (e.g., backyard practice vs. competitive play)
- Portability requirements
- Personal preferences
Popular designs include portable baskets, in-ground installations, and modular systems. Research various designs to find one that best suits your needs.
Selecting High-Quality Materials
The materials you choose will significantly affect the durability and performance of your DIY disc golf basket. Consider the following options:
Metal Components
For the chains and frame, materials like stainless steel and aluminum are ideal due to their strength and resistance to corrosion.
Plastic Components
For the basket and other parts, durable plastics such as HDPE (High-Density Polyethylene) are recommended. These materials are lightweight yet strong enough to withstand repeated use.
Step-by-Step Assembly Guide
Once you've gathered all the necessary components and tools, it's time to start assembling your DIY disc golf basket. Follow these steps for a smooth and successful build:
Step 1: Prepare the Frame
Begin by constructing the frame, ensuring it's sturdy and properly aligned. Use welding equipment if necessary to secure metal parts.
Step 2: Install the Chain Assembly
Attach the chains to the frame in the desired pattern. Make sure they're evenly spaced and securely fastened.
Step 3: Add the Basket
Position the basket beneath the chain assembly, ensuring it aligns correctly with the chains. Secure it to the frame using bolts or screws.
Step 4: Mount the Basket
Finally, attach the pole mount to the frame and secure it to the ground or base. Test the stability of the entire structure before using it.
Customizing Your Disc Golf Basket
One of the greatest advantages of building your own disc golf basket is the ability to customize it. Consider adding personal touches, such as:
- Custom paint or decals
- Unique chain patterns
- Adjustable height options
- Additional features like scoreboards
Customization not only enhances the aesthetic appeal of your basket but can also improve its functionality.
Maintaining Your DIY Disc Golf Basket
Proper maintenance is key to extending the lifespan of your DIY disc golf basket. Follow these tips to keep your basket in top condition:
- Regularly inspect the chains and basket for wear and tear
- Clean the basket after each use to prevent dirt buildup
- Lubricate moving parts periodically
- Check the stability of the pole mount
By maintaining your basket regularly, you'll ensure it remains functional and enjoyable for years to come.
Cost Comparison: DIY vs. Commercial Baskets
One of the primary motivations for building a DIY disc golf basket is cost savings. While commercial baskets can be expensive, creating your own allows you to control expenses by choosing affordable yet quality materials.
According to a study by the Professional Disc Golf Association (PDGA), the average cost of a commercial disc golf basket ranges from $500 to $1,000. In contrast, a DIY basket can be constructed for as little as $200-$400, depending on the materials and tools used.
Expert Tips for Success
Here are some expert tips to ensure your DIY disc golf basket project is a success:
- Plan thoroughly before starting construction
- Use high-quality materials for durability
- Take your time during assembly to avoid mistakes
- Test the basket thoroughly before using it in gameplay
By following these tips, you'll increase your chances of building a high-performing disc golf basket.
Conclusion and Next Steps
Building your own DIY disc golf basket is an excellent way to enhance your disc golf experience while saving money. By following the steps outlined in this guide, you can construct a functional and durable basket tailored to your needs.
We encourage you to share your thoughts and experiences in the comments section below. Additionally, feel free to explore other articles on our site for more disc golf tips and tricks. Happy building and enjoy your disc golf journey!